Determine the simple steps and know how to split pst file by year with accurate results
The users who are working with the MS Outlook application are using the default PST file for their working processes. After some time, they observe some of the problems like these personal storage files becoming large in size which can hamper the application performance to a great extent. Thus, in such situations, the clients are looking for feasible solutions in which they can split the huge PST documents into different PST files. This will make reduce the file size issue.
Manual methods for how to split pst file by year is discussed below:
In the Outlook application, if you need to split the PST file with the year option, this is possible by using the Archive feature. Follow the below steps for the same:
Step1:In the Outlook application, the users need to go to the File tab as shown below. Then choose the archive option.
Step 2: Now, in the next step, choose the Archive this folder and all subfolders option.
Step 3:Now as shown in the below image, you need to select the option from the dropdown list i.e. Archive items older than (here you need to provide the date so that the files which are before the provided date will be archived).
Step 4:Now, in the further step, you need to browse the destination location which should be available on your local machine and not on the network. Provide the appropriate path and then click on the ok button as shown in the below screenshot.
After the above processes, you will be able to see the Archive folders in the same way shown in the below picture.
Once you are done with the above procedure successfully, you will realize that there is no variation available in the size of the PST file. You know why because the Outlook PST file is a huge database file. If you wish to get accurate results then always try to choose the professional application for such job completion. The reason behind this is that the third-party tool is a complete tested tool available in the market. You can check a number of reviews provided by other individuals what was their experience, how they find it feasible to work with the tool, and similarly many more.
Have you thought of splitting the Outlook PST file customizing the process by year?
There are many users who have the related queries because they are willing to split their Outlook personal storage file with the help of customizing with year. Here, we will discuss the steps and feasible processes which can help you to attain the desired results in an appropriate time frame. For this, we are presenting the concept of a third-party tool that is verified by many of the clients as per their requirements.
Split PST Pro is one of the leading tools available in the IT industry. With the help of this software, the users can know how to split pst file by year functionality in an easy manner. The tool provides you the benefits to choose the demo version for understating the working process. Therefore, it recommends for the clients download the freeware version of Split PST Pro so that they can easily understand and go through the steps. In case of any problems, you can directly communicate with the technical support team who are available 24*7 for your help.
Thus, without wasting the time, let’s begin the process of using this extraordinary tool developed by the developers for the sake of their users.
This software is one of the easiest solutions available in the market which can help you with a number of benefits. Some of the advantages are given below:
- The users can divide any file size of Outlook PST into smaller parts with this tool.
- Also, there is an option provided in which you can know how to split pst file by year.
- There is no problem with Windows versions as this tool is completely compatible with all the available versions of the Windows operating system.
- If you are in need to split PST files with the help of folder option then also, this third-party application can provide you with respective solutions.
Working on Split PST Pro
Step 1:Download the respective software and install it on your computer machine. Once you have successfully installed the tool you need to run the application on your system to process the further steps.
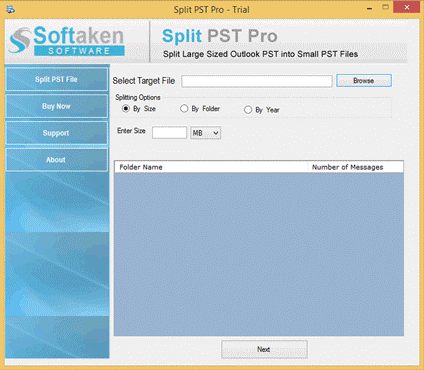
Step 2:The following screen panel will be displayed on your computer desktop or laptop screen where you are processing these steps. Check out the below image to get a complete understanding.
Here, you need to add the respective PST file by clicking on the browse button and then choosing the appropriate radio button as stated in the above picture.
Step 3:Once you are done with the above steps, you will be able to see the below image on your computer screens. This panel will display you the preview of your PST files in a similar way it is shown in the below picture. From here, you can select any of the radio options as per your wish to split the PST size as per its size, by folder, or by year. In this case, you need to choose the option given as By year. Then proceed to click the next button.
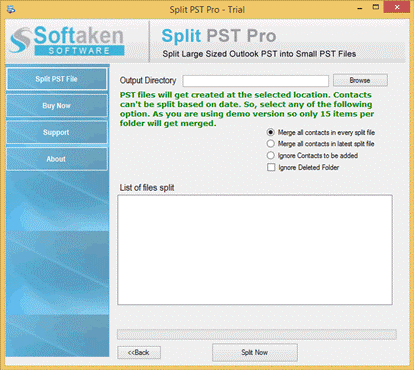
Step 4:Once you are found doing the above step. Now is the time to proceed further and save the targeted file at an appropriate location as shown in the below image. With the help of the browse button, you need to provide the appropriate destination file location. And then click on the provided Next button. This will start the process and provide you with the resultant result in a small span of time.
In such simple steps, the users can attain valuable results without losing any of their data. The complete information is in safe hands as this is one of the trusted brands available in the market.

